Stunning Creations
  • Home
  • OUR SERVICES
    • Overview of Services
    • WEB DESIGN AND DEVELOPMENT >
      • Why have website?
      • Self Build Platform >
        • First Steps
        • Help Centre
      • Pro websites >
        • Free Quote
        • Build Me 1 Packages
      • ONE PLAN
    • GRAPHIC DESIGN AND PRINT >
      • Creative logo
      • Brochure Design
      • Leaflets & Flyers Design
      • Company Branding
      • Business Stationery
    • DIGITAL MARKETING >
      • Pay Per Click Advertising Agency | Stunning Creations LTD
      • SOCIAL MEDIA SUPPORT >
        • Facebook Support For Start-ups and Small Businesses >
          • How to Create a Facebook Page For your Business in 5 Simple Steps
          • Bring your Facebook page to life with Tips for successful
          • How to set-up and promote your business on Facebook in UK | Live Webinar
    • PROFESSIONAL EMAIL ADDRESS
    • HINTS AND TIPS
  • Past Projects
  • About Us
    • News
    • Job Opportunities
    • Terms & Conditions >
      • PRIVACY POLICY
  • store
    • Christmas sweet jars
    • Product

Add Picture Elements Your Website

2/10/2014

 
There are four main elements that can be used to add images to a site:  
  • The above mentioned paragraph with picture element.
  • The picture element -- upload one image per element.
  • The picture gallery element -- upload as many pictures as you like to create a gallery of clickable images.
  • The slideshow element -- upload as many pictures as you like to create a slideshow of images. 
Adding any image element to your site works the same way as adding a text element - just drag it to the page. 
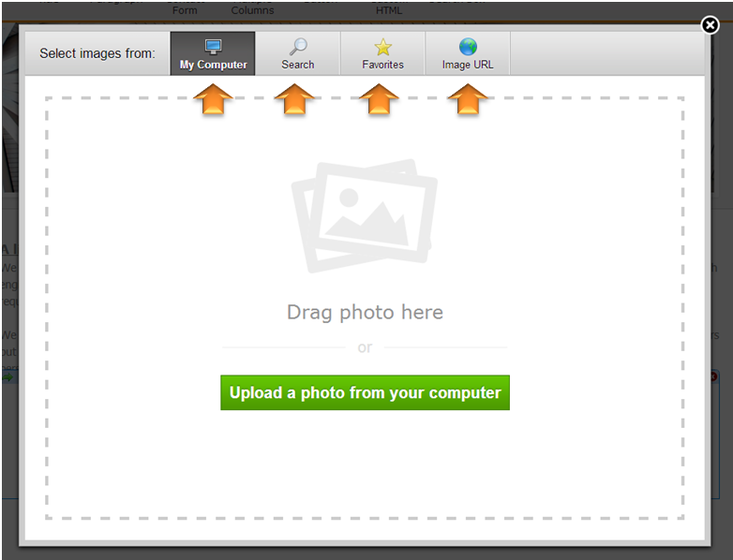
Uploading an image to a picture element is as simple as clicking the big gray Sample Image.
Picture
This opens a dialog box where you select how you want to upload your image.  You can:
  • Upload an image from your computer. 
  • Select one from Flickr's free, searchable library of creative commons licensed images.  Using this option will add a small copyright attribution to the footer of your site linking to the photographer who took the image. 
  • Use one of your Favourites.
  • Enter the address of an image from out on the internet.  You should only use this third option if you already own the image you're embedding.  
Picture
In this example I've selected the My Computer option and then clicked Choose File.  Doing so opens a file browser on the computer through which an image can be selected. 
One you that there are a number of different ways to change and edit an uploaded image by clicking on it, then you'll notice the gray box that pop up with a menu that appears above the image.  Using this you can:
  • Edit image.
  • Replace the current image with a new one.
  • Position the image to the left / center / right of the element (you can also drag the image within the element to do this).
  • Set it to open larger when clicked.
  • Link the image to site, page, email address or file. 
  • Set the margins around the image with Spacing. 
  • Add a caption to the image. 
  • Delete the image. 
  • Select a gray or black border
  • Use the Advanced option set a border size (or no border at all)  and enter Alt Text if needed (if you don't know what Alt Text is then don't worry about using it). 
  • Resize by moving over to the lower right hand corner.
Picture
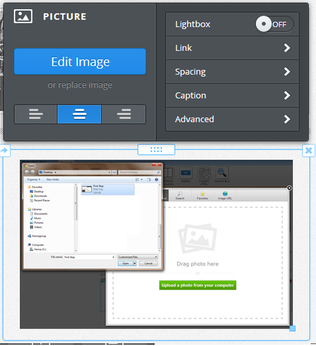
If you click edit button new menu will appears at the top of the page looking something like below.  
Picture
As you can see, each element we've added is stacked above or beneath another element like a column of building blocks.  Elements stack on top of one another by default within the editor.  

But what if we want to place two or more elements side-by-side? To do that, move on to the next step and learn how to Alter Your Layout.

Comments are closed.
    1. First Step
    2. Adding Elements
    3. Add Pictures
    4. Layout Of A Page
    5. Themes & Edit Fonts
    6. Edit The Header
    7. Adding Pages
    8. Adding Blog

Main Links

Home
Our Services
About Us
Contact Us

Our Services

Pro Website
Self Build
Email Services

Domain Name

About Us

About Us
Our News
Our Mission
Our Terms & Conditions


Hint & Tips Blog
Job Opportunities
Find Us
Subscribe

TERMS & CONDITIONS | PRIVACY POLICY

COPYRIGHT © STUNNING CREATIONS... All Rights Reserved...

  • Home
  • OUR SERVICES
    • Overview of Services
    • WEB DESIGN AND DEVELOPMENT >
      • Why have website?
      • Self Build Platform >
        • First Steps
        • Help Centre
      • Pro websites >
        • Free Quote
        • Build Me 1 Packages
      • ONE PLAN
    • GRAPHIC DESIGN AND PRINT >
      • Creative logo
      • Brochure Design
      • Leaflets & Flyers Design
      • Company Branding
      • Business Stationery
    • DIGITAL MARKETING >
      • Pay Per Click Advertising Agency | Stunning Creations LTD
      • SOCIAL MEDIA SUPPORT >
        • Facebook Support For Start-ups and Small Businesses >
          • How to Create a Facebook Page For your Business in 5 Simple Steps
          • Bring your Facebook page to life with Tips for successful
          • How to set-up and promote your business on Facebook in UK | Live Webinar
    • PROFESSIONAL EMAIL ADDRESS
    • HINTS AND TIPS
  • Past Projects
  • About Us
    • News
    • Job Opportunities
    • Terms & Conditions >
      • PRIVACY POLICY
  • store
    • Christmas sweet jars
    • Product