|
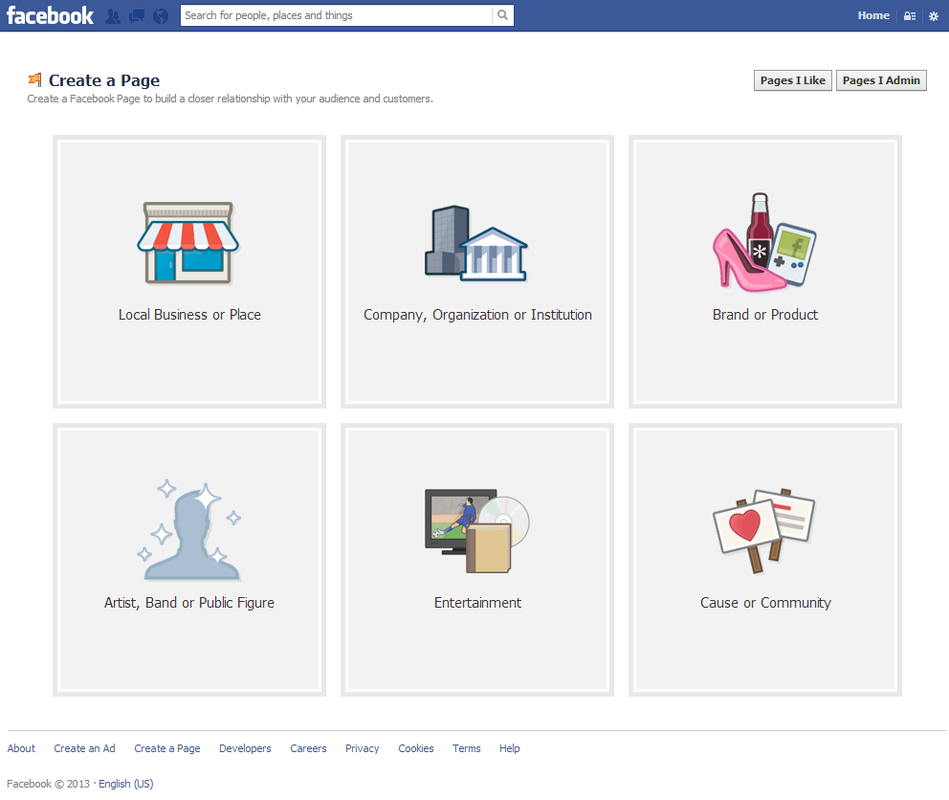
As you can see, choose from one of the following six classifications:
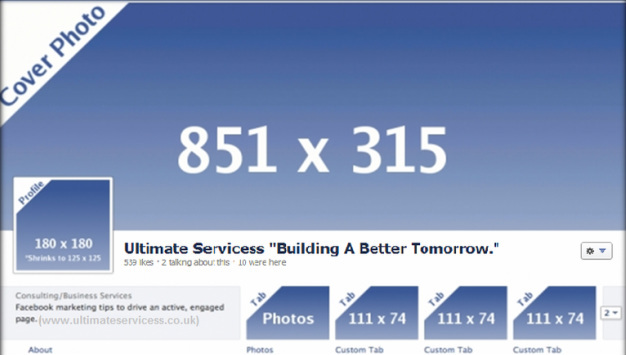
After selecting one of the six, choose the category you're in and fill out your business name (or if you selected one of the other options, your brand or company name). The business option also asks for further location information. 2) Complete Basic Information Upload Photo Facebook will now prompt you to upload the main photo for your page. This photo will appear as your icon every time you comment on a post or appear in news feeds. Ideally, it should be your company logo. The actual dimensions of your profile picture is 180X180. This will shrink on your page to appear as 125X125. About Section Next, you need to write your 'About' information. This small blurb will serve as the main 2-3 sentence description for your company. It will be on your main page, so make it descriptive but succinct. Be sure to include a link to your company website as well. Also ensure that this information differentiates your brand, making your page even more appealing to potential followers. 3) Use Your Admin Panel Your admin panel is the core centre for managing your business page. It's filled with countless features and options to optimize your page and your monitoring of that page. Edit Page The 'Edit Page' option in the upper right provides various options. The first option, 'Update Info,' allows you to update the basic information you provided earlier in the tutorial. This will also allow you to enter a description, which is an extended version of the 'About' information you entered earlier. Users only see the description by accurately clicking 'About' on your business page, so you should feel comfortable sharing extensive and more detailed information in your description. You can also manage the roles of your page administrators. This allows you to invite various employees from your business to be administrators on your Facebook page in order to respond to comments or messages specific to their function, without giving them complete power over your page. The other options under 'Edit Page' allow you to manage your notifications and add page permissions. Build Audience Often, marketers get so excited that they have started a Facebook page that they invite users right away. But challenge yourself to think about a more strategic method for inviting users. First, you want your page filled with content. Then invite your brand advocates to start engaging with that content. Once your page has some interactions, invite more fans and contacts, and they'll be more interested to like the page when they see the buzzing hub it is. From that point, it's at your discretion if you'd like to use Facebook's advertising tools to further promote the page. 4) Fill the Page With Content Cover Photo With the introduction of Timeline came the introduction of your best visual real estate on your business page: the cover photo. The exact dimensions of this cover photo are 851X315 to date. Be sure to select a creative horizontal image that will appeal to users who land on your page. 1) Choose a Classification Navigate to the following URL in a new tab to create your business page on Facebook: https://www.facebook.com/pages/create.php Custom Tabs
Facebook also allows you to have an endless amount of tabs on your page. As you can see in the image above, you can only modify four of them -- meaning only four can appear on the page before the user has to click the arrow to see the rest. Think critically about what you want to appear in these four slots, whether it's events, photos, groups, etc. Keep in mind that if you use third party applications, you should configure the tabs to be indexed on Facebook and not on the third party server. Posts When posting on your page, be sure to use a variety of content. What images would your audience like to see? What stats would they like to read? What links would they like to click? You can also click the little star to the upper right of any post to highlight it horizontally across your entire page. Not only will this make it look like you have a cover photo on your actual timeline of posts, but it will highlight the page as a milestone in your company history. Use this feature for product announcements, business anniversaries, and other major events pertinent to your brand. Monitor While having a stunning Facebook page is awesome, you want to ensure you're monitoring how fans are interacting with it. To the upper right of your Admin panel, you'll see all the private messages users are sending to your page. Meanwhile, the upper left and centre of the panel shows all the posts users are liking and commenting on. Be sure to respond to comments and messages as needed to ensure your fans know you not only care about them, but to avoid the detrimental impact of ignoring these folks. 5) Measure Your Efforts At this point, you've built and shared a Facebook business page that accurately represents your business. Now you need to measure your efforts to ensure you're making valuable marketing decisions on Facebook. Click on the 'View Insights' option to the bottom-center of your Admin panel. You'll be able to monitor reach, engagement, and the like in order to help you grow and adapt your Facebook marketing efforts around what's working and what's not. And if you really want to spend time perfecting your Facebook content strategy. Comments are closed.
|
So set your budget for the year, month or week and contact us to get started:
|
Main Links |
Our Services |
About Us |
|
Find Us
|
TERMS & CONDITIONS | PRIVACY POLICY
COPYRIGHT © STUNNING CREATIONS... All Rights Reserved...


